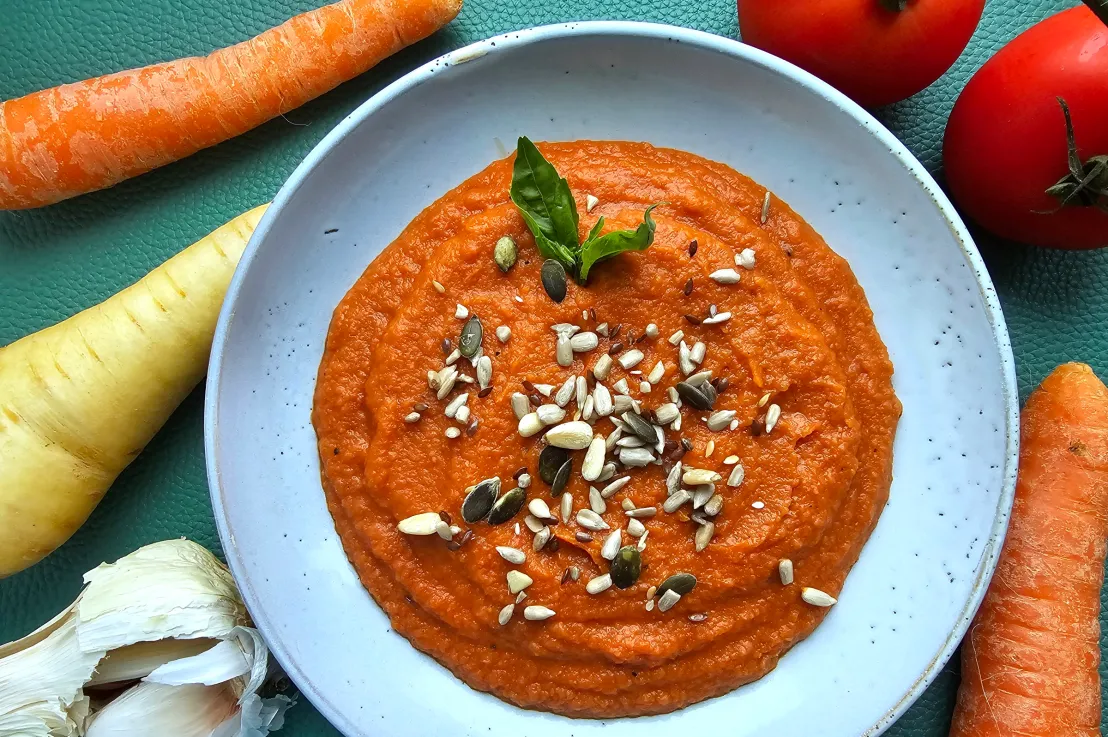
Click here to send us an email. Click here to call us.

Category: Recipes

Are you looking for a comforting winter snack? This Winter Tomato Bruschetta is the perfect plate, offering a burst of freshness and flavour during the colder months. The combination of ripe tomatoes, aromatic basil, and the slight tang of balsamic vinegar is a delightful contrast to the warm, toasted baguette. Whether you serve it at a winter gathering or simply as a cozy snack by the fireplace, it’s sure to brighten your winter days!

Ingredients:

4 ripe Roma tomatoes, diced

1/4 cup red onion, finely chopped

2 cloves garlic, minced

1/4 cup fresh basil, chopped

2 tablespoons extra-virgin olive oil

1 tablespoon balsamic vinegar

Salt and pepper to taste

1 French baguette, sliced into 1/2-inch thick rounds

1/4 cup vegan or regular cream cheese (optional)

Method:

Step 1 – Prepare the Tomato Topping: In a bowl, combine the diced tomatoes, red onion, minced garlic, and fresh basil. Drizzle extra-virgin olive oil and balsamic vinegar over the mixture. Season with salt and pepper to taste. Gently toss to combine all the ingredients. Set aside and allow the flavours to meld while you prepare the baguette slices.

Step 2 – Toast the Baguette: Preheat your oven’s broiler or a toaster oven. Place the baguette slices on a baking sheet and lightly toast them under the broiler for 1-2 minutes on each side, or until they become golden brown.

Step 3 – Spread Cream Cheese (Optional): If you’d like to add a creamy layer to your bruschetta, spread a thin layer of vegan or regular cream cheese on each toasted baguette slice.

Step 4 – Top with Tomato Mixture: Spoon a generous portion of the tomato topping onto each baguette slice. Make sure to include a good balance of tomatoes, onions, and fresh basil.

Step 5 – Serve: Arrange your winter tomato bruschetta on a serving platter, and garnish with additional fresh basil leaves. These can be enjoyed immediately while they’re still warm.

Happy National Nacho Day!

To celebrate National Nacho Day, try out this tomato nachos recipe. They are a delightful combination of fresh and zesty flavours, making for a vibrant, satisfying snack or appetiser, and the juicy tomato base adds a unique twist to this classic dish. Enjoy the burst of tomato goodness in every bite!

Tomato nachos are a refreshing twist on the classic nacho dish. They are packed with flavour, and the tomatoes add a burst of juiciness to every bite. This recipe is perfect for a quick snack or appetiser for gatherings.

Ingredients:

4 large ripe tomatoes, sliced into rounds

1 cup tortilla chips

1 cup vegan or regular shredded cheese (cheddar, Monterey Jack, or a blend)

1/2 cup black beans, cooked and drained

1/2 cup corn kernels (fresh, frozen, or canned)

1/4 cup sliced black olives

1/4 cup diced red onion

1/4 cup chopped fresh cilantro

1 jalapeño pepper, thinly sliced (optional, for some heat)

1/2 teaspoon ground cumin

1/2 teaspoon chili powder

Salt and pepper to taste

Guacamole and salsa for serving


Method:

Step 1 – Preheat the Oven: Preheat your oven to 175°C.

Step 2 – Prepare the Tomatoes: Place the tomato rounds on a paper towel to remove excess moisture. This will prevent your nachos from becoming soggy. Season each tomato round with a pinch of salt and pepper.

Step 3 – Assemble the Nachos: On a large baking sheet or ovenproof platter, arrange the tomato rounds in a single layer. Layer each tomato round with tortilla chips, a sprinkle of shredded cheese, black beans, corn kernels, sliced black olives, and diced red onion. You can layer the ingredients more than once to create multiple tiers of nachos.

Step 4 – Season: Evenly sprinkle ground cumin and chili powder over the nachos for added flavour. If you like it spicy, add the jalapeño slices.

Step 5 – Bake: Place the nachos in the preheated oven and bake for about 10-12 minutes or until the cheese is melted, and the toppings are heated through.

Step 6 – Serve: Remove the tomato nachos from the oven and sprinkle them with fresh cilantro. Serve them with guacamole and salsa on the side for dipping.

Happy World Vegan Day!

To celebrate World Vegan Day, give this Vegan Tomato and Chickpea Stew a try! Not only is it delicious but also rich in plant-based protein and essential nutrients. It’s perfect for a quick weeknight dinner or meal prep for lunch. Enjoy the hearty flavours of tomatoes and spices in this wholesome vegan stew.

Ingredients:

1 tablespoon olive oil

1 onion, chopped

3 cloves garlic, minced

1 red bell pepper, diced

1 yellow bell pepper, diced

1 can (14 oz) chickpeas, drained and rinsed

1 can (14 oz) diced tomatoes

1 cup vegetable broth

1 teaspoon smoked paprika

1 teaspoon ground cumin

1/2 teaspoon ground coriander

1/2 teaspoon chili powder (adjust to taste)

Salt and black pepper, to taste

1 cup fresh spinach or kale, chopped

Juice of 1 lemon

Fresh cilantro or parsley for garnish


Method:

Step 1 – Sauté the Aromatics: In a large pot, heat the olive oil over medium heat. Add the chopped onion and garlic and sauté for about 2-3 minutes until the onion becomes translucent.

Step 2 – Add Bell Peppers: Add the diced red and yellow bell peppers to the pot. Cook for another 2-3 minutes until they start to soften.

Step 3 – Spices and Chickpeas: Stir in the smoked paprika, ground cumin, ground coriander, and chili powder. Add the chickpeas and mix well to coat them with the spices.

Step 4 – Tomatoes and Broth: Pour in the canned diced tomatoes (with their juice) and vegetable broth. Stir to combine all the ingredients. Season with salt and black pepper to taste.

Step 5 – Simmer: Bring the mixture to a simmer, then reduce the heat to low. Cover the pot and let it simmer for about 15-20 minutes, allowing the flavours to meld and the stew to thicken.

Step 6 – Add Greens: Stir in the chopped spinach or kale, and let it wilt into the stew, which should take about 2-3 minutes.

Step 7 – Finish with Lemon: Squeeze the juice of one lemon into the stew and stir to incorporate. This adds a delightful touch of brightness.

Step 8 – Serve: Ladle the Vegan Tomato and Chickpea Stew into bowls. Garnish with fresh cilantro or parsley.

Happy National Cheese Toastie Day!

To celebrate this  gouda day, we would like to share with you this delicious Cheese Toastie with Tomatoes recipe.

This comforting and versatile sandwich combines the classic flavours of melted cheese and ripe tomatoes. Feel free to get creative with additional seasonings or add-ins to customise it to your taste preferences!

 Ingredients:

4 slices of your favourite bread

1-2 ripe tomatoes, thinly sliced

1 1/2 cups shredded cheddar cheese (or your preferred cheese)

2 tablespoons butter, softened

Salt and pepper, to taste

Optional additions: a sprinkle of dried basil or a few fresh basil leaves, a dash of hot sauce, or a slice of cooked bacon

Method:

Step 1 – Butter the Bread: Lay out the slices of bread and spread a thin layer of softened butter on one side of each slice. This will become the outer, crispy layer of the toastie.

Step 2 – Layer the Fillings: On the unbuttered side of one bread slice, place a layer of thinly sliced tomatoes. Season the tomatoes with a pinch of salt and pepper to enhance their flavour.

Step 3 – Add Cheese: Sprinkle a generous amount of shredded cheddar cheese (or your preferred cheese) over the tomatoes. If you like it extra cheesy, go ahead and load it up!

Step 4 – Optional Additions: If you want to add some extra flavour, consider sprinkling a bit of dried basil, adding a few fresh basil leaves, or drizzling a dash of hot sauce over the cheese. You can also add a slice of cooked bacon for a smoky twist.

Step 5 – Create the Sandwich: Place another slice of bread on top of the cheese and fillings, buttered side facing out.

Step 6 – Cook the Toastie: Heat a skillet or griddle over medium-low heat. Once it’s hot, carefully place the cheese toastie onto the skillet. Cook it for 2-3 minutes on each side, or until the bread becomes golden brown and crispy, and the cheese melts to your desired gooeyness.

Step 7 – Press and Flip: If you have a panini press or a sandwich press, you can use it to press down on the toastie as it cooks. If not, you can use a spatula to gently press it while cooking, which helps melt the cheese and create that deliciously crispy exterior.

Step 7 – Slice and Serve:Once both sides are beautifully golden and the cheese is melted, remove the toastie from the skillet. Let it cool for a moment before slicing it in half diagonally. This makes it easier to handle and enjoy.

Spooky Season is upon us and what better way to get into the Halloween spirit than with some spooky snacks?

These tasty tortilla bats are scarily delicious. Not only are they delicious but also make for a spooky and playful Halloween treat. Perfect for parties or family gatherings, they’re sure to delight guests of all ages with their eerie charm and fantastic flavour.

Ingredients:

For the Tortilla Bats:

4 large flour tortillas

2 cups shredded cheese (cheddar or a blend)

1 cup cooked and shredded chicken (optional)

1/2 cup black olives, sliced

1/2 cup sour cream (for decorating)

1/4 cup black beans, drained and rinsed

1/4 cup red bell pepper, finely chopped

Cooking spray

For the Tomato Salsa:

4 ripe tomatoes, diced

1/2 red onion, finely chopped

1/4 cup fresh cilantro, chopped

1 jalapeño pepper, finely chopped (adjust for spiciness)

Juice of 1 lime

Salt and pepper to taste

Method:

For the Tortilla Bats:

Step 1 – Preheat the Oven: Preheat your oven to 350°F (175°C) and line a baking sheet with parchment paper.

Step 2 – Cut Bat Shapes: Using a bat-shaped cookie cutter or a paper template, cut bat shapes from the flour tortillas. You can make as many bats as you’d like, depending on the size of your tortillas.

Step 3 – Add Filling: In a bowl, combine the shredded cheese, cooked chicken (if using), black olives, black beans, and red bell pepper. Place a spoonful of this mixture on half of the bat-shaped tortillas.


Step 4 – Top and Seal: Place the remaining tortilla bats on top of the filling. Use a bit of water to help seal the edges, pressing down with a fork to create a decorative edge. This seals in the filling.

Step 5 – Bake: Place the bat-shaped tortillas on the prepared baking sheet. Lightly spray the tops with cooking spray. Bake in the preheated oven for about 10-12 minutes, or until they are golden brown and crisp.

Step 6 – Decorate: Once the tortilla bats have cooled slightly, use sour cream to draw spooky bat faces on top. You can get creative with the expressions!


For the Tomato Salsa:

Step 1 – Prepare the Ingredients: In a bowl, combine the diced tomatoes, chopped red onion, cilantro, and jalapeño pepper.

Step 2 – Add Flavour: Squeeze the juice of one lime over the mixture and season with salt and pepper. Stir well to combine.

Step 3 – Plate: Place your tortilla bats on a serving platter.

Step 4 – Dip: Serve the spooky tortilla bats alongside the fresh tomato salsa as a delicious and fun Halloween snack. Enjoy!

As the colder weather gets closer and the season of comfort food is upon us, what could be better than coming home to a sensational soup?

This homemade tomato soup is a comforting and versatile dish, perfect for warming up on a chilly day or as a quick and easy meal. Customise it to your liking, and don’t forget to enjoy it with your favourite accompaniments!

 Ingredients:

2 tablespoons butter or olive oil

1 onion, chopped

2 cloves garlic, minced

1 carrot, chopped (optional, for added sweetness)

2 (14-ounce) cans of whole tomatoes (or 4 cups of fresh tomatoes, peeled and chopped)

1 (14-ounce) can of tomato sauce

2 cups vegetable or chicken broth

1 teaspoon sugar (optional, to balance acidity)

1 teaspoon dried basil

1/2 teaspoon dried oregano

Salt and pepper to taste

1/2 cup heavy cream or half-and-half (optional, for creamier soup)

Fresh basil leaves or croutons for garnish (optional)

 Method:

Step 1 – Sauté the Aromatics: In a large pot or Dutch oven, melt the butter or heat the olive oil over medium heat. Add the chopped onion, garlic, and carrot (if using). Sauté for about 5 minutes, or until the vegetables become soft and translucent.

Step 2 – Add the Tomatoes: If using whole canned tomatoes, crush them with your hands or a wooden spoon and add them to the pot along with their juices. If using fresh tomatoes, add them now. Also, pour in the tomato sauce.

Step 3 – Season and Simmer: Stir in the vegetable or chicken broth, sugar (if using), dried basil, dried oregano, salt, and pepper. Bring the mixture to a boil, then reduce the heat to low. Cover the pot and let the soup simmer for about 15-20 minutes, allowing the flavours to meld.

Step 4 – Blend the Soup: Using an immersion blender, blend the soup directly in the pot until smooth and creamy. If you don’t have an immersion blender, carefully transfer the soup in batches to a blender and blend until smooth, then return it to the pot.

Step 5 – Add Cream (Optional): If you desire a creamier tomato soup, add the heavy cream or half-and-half to the pot and stir well. Allow the soup to heat through but avoid boiling once the cream is added.

Step 6 – Adjust Seasoning: Taste the soup and adjust the seasoning with additional salt, pepper, or sugar if needed to suit your taste.

Step 7 – Serve: Ladle the tomato soup into bowls. Garnish with fresh basil leaves or croutons if desired.

It’s National Curry Week!

To celebrate National Curry Week, this is the best time to share our mouthwatering recipe for a tasty tomato curry…

This tomato curry is a flavourful and comforting dish that’s quick and easy to prepare. The combination of ripe tomatoes and aromatic spices creates a rich and tangy sauce that’s perfect for scooping up with bread or pairing with rice. Adjust the spice level to your liking and savour the delightful taste of this homemade tomato curry. 

Ingredients:

4 large tomatoes, chopped

1 onion, finely chopped

2 cloves garlic, minced

1-inch piece of ginger, minced

2 green chilies, finely chopped (adjust to your spice preference)

1 teaspoon cumin seeds

1 teaspoon coriander powder

1/2 teaspoon turmeric powder

1/2 teaspoon red chilli powder (adjust to taste)

1 teaspoon garam masala

2 tablespoons cooking oil

Salt to taste

Fresh cilantro leaves for garnish

Method:

Step 1 – Heat Oil: Heat the cooking oil in a pan or skillet over medium heat.

Step 2 – Sauté the Aromatics: Add the cumin seeds and let them splutter. Then, add the chopped onion, minced garlic, minced ginger, and green chilies. Sauté until the onions turn translucent and the raw aroma of the garlic and ginger disappears, usually about 3-4 minutes.

Step 3 – Add Spices: Add the coriander powder, turmeric powder, red chilli powder, and a pinch of salt. Sauté for another minute to roast the spices and release their flavours.

Step 4 – Cook the Tomatoes: Add the chopped tomatoes to the pan and stir well. Cook the tomatoes until they become soft and start to break down, about 5-7 minutes. Use the back of your spoon to mash some of the tomato pieces.

Step 5 – Simmer: Reduce the heat to low, cover the pan, and let the mixture simmer for about 10-15 minutes. This will allow the flavours to meld, and the sauce to thicken.

Step 6 – Season: Season the tomato curry with salt and garam masala. Adjust the salt and spice level to your preference by adding more if needed.

Step 7 – Garnish and Serve: Once the tomato curry reaches your desired consistency and flavour, remove it from heat. Garnish with fresh cilantro leaves.

Step 8 – Serve: Tomato curry is excellent when served with steamed rice, naan, or crusty bread. Enjoy!

Mediterranean Stuffed Tomatoes with Quinoa are a flavourful and nutritious dish that can be served as a main course or a hearty side dish. Enjoy the combination of fresh tomatoes, tangy feta cheese, aromatic herbs, and wholesome quinoa!

Not only is this delicious dish visually appealing but also packed with vibrant flavours. The blend of ingredients creates a delightful Mediterranean-inspired dish that’s both satisfying and nutritious.

Ingredients:

  •       4 large tomatoes
  •       1 cup cooked quinoa
  •       1/2 cup crumbled feta cheese
  •       1/4 cup chopped Kalamata olives
  •       1/4 cup chopped fresh parsley
  •       1/4 cup chopped fresh basil
  •       2 cloves garlic, minced
  •       2 tablespoons extra-virgin olive oil
  •       1 tablespoon lemon juice
  •       Salt and pepper to taste

Instructions:

Step 1 – Preheat the Oven: Preheat your oven to 190°C

Step 2 – Prepare the Tomatoes: Cut the tops off the tomatoes and set them aside. Carefully scoop out the pulp and seeds from the tomatoes using a spoon, creating a hollow cavity. Reserve the pulp for later use.

Step 3 – Make the Filling: In a mixing bowl, combine the cooked quinoa, crumbled feta cheese, chopped olives, chopped parsley, chopped basil, and minced garlic.

Step 4 – Prepare the Tomato Pulp: Take the reserved tomato pulp and seeds and gently squeeze out excess juice. Chop the pulp and add it to the quinoa mixture.

Step 5 – Season and Mix: Drizzle the extra-virgin olive oil and lemon juice over the quinoa mixture. Season with salt and pepper to taste. Gently mix all the ingredients until well combined.

Step 6 – Stuff the Tomatoes: Using a spoon, stuff each hollow tomato with the quinoa mixture, pressing it down gently to pack it.

Step 7 – Replace the Tomato Tops: Place the tops of the tomatoes back on, creating a lid for the stuffed tomatoes.

Step 8 – Bake: Place the stuffed tomatoes in a baking dish or on a baking sheet. Bake in the preheated oven for about 20-25 minutes, or until the tomatoes are softened and the filling is heated through.

Step 9 – Serve: Carefully transfer the stuffed tomatoes to serving plates. You can remove the tomato tops before serving or leave them on for presentation. Drizzle with a little extra olive oil and sprinkle with additional chopped herbs if desired.

These Tomato and Mozzarella Panini are a delightful combination of flavours and textures. The juicy tomatoes, creamy mozzarella, and fragrant basil create a harmonious taste that’s enhanced by the crispy, toasted bread. Whether enjoyed as a quick lunch or a satisfying dinner, these panini are a treat for your taste buds.

Ingredients:

  •       4 ciabatta rolls or slices of rustic bread
  •       2 medium tomatoes, sliced
  •       8 ounces fresh mozzarella cheese, sliced
  •       Fresh basil leaves
  •       2 tablespoons balsamic glaze (optional)
  •       2 tablespoons olive oil
  •       Salt and pepper to taste

Method:

Step 1 – Preheat the Panini: If you’re using a panini press, preheat it according to the manufacturer’s instructions. If using a pan on the hob, heat it over medium-high heat.

Step 2 – Assemble the Panini: Slice the ciabatta rolls in half if they’re not pre-sliced, layer the mozzarella slices on one side of each roll, arrange the tomato slices on top of the mozzarella, place fresh basil leaves over the tomatoes, drizzle a little balsamic glaze over the basil if desired, season with a pinch of salt and pepper.

Step 3 – Close and Brush with Olive Oil: Close the sandwiches with the other halves of the ciabatta rolls. Brush the outer sides of the sandwiches with olive oil. This will help the bread get crispy and golden when grilled.

Step 4 – Grill the Panini: If using a panini press, place the assembled panini onto the preheated press. Close the lid and cook for about 3-5 minutes, or until the bread is golden and the cheese is melted. If using a frying pan, place the assembled panini onto the hot pan. Use a heavy skillet or a panini press to press down on the sandwiches. Cook for about 2-3 minutes on each side, until the bread is toasted and the cheese is melted.

Step 5 – Serve and Enjoy: Once the panini are ready, remove them from the grill or press. Allow them to cool for a minute before slicing in half. Serve the Tomato and Mozzarella Panini while they’re still warm and the cheese is gooey.

This Margherita Pizza is a timeless favourite that highlights the simplicity and quality of its ingredients. The combination of tomato sauce, fresh mozzarella, and fragrant basil creates a burst of flavours with every bite. Whether you’re making it for a casual dinner or a special occasion, Margherita Pizza never fails to satisfy.

Ingredients:

For the Pizza Dough:

  •       1 pound pizza dough (shop-bought or homemade)
  •       Flour, for dusting


For the Pizza Sauce:

  •       1 can (14 ounces) crushed tomatoes
  •       2 cloves garlic, minced
  •       1 tablespoon extra-virgin olive oil
  •       1 teaspoon dried basil
  •       1 teaspoon dried oregano
  •       Salt and pepper to taste

For the Toppings:

  •       8 ounces fresh mozzarella cheese, sliced
  •       Fresh basil leaves
  •       Extra-virgin olive oil, for drizzling
  •       Salt and pepper to taste


Method:

Step 1 – Preheat the Oven: Preheat your oven to the highest temperature it can reach (usually around 260°C). If you have a pizza stone, place it in the oven to preheat as well.

Step 2 – Prepare the Sauce: In a saucepan, heat the olive oil over medium heat. Add the minced garlic and sauté for about 1 minute until fragrant. Pour in the crushed tomatoes and add the dried basil, dried oregano, salt, and pepper. Simmer the sauce for about 10-15 minutes until it thickens slightly. Remove from heat and set aside.

Step 3 – Roll Out the Dough: On a floured surface, roll out the pizza dough into a circle or your desired shape. If the dough is sticking, you can dust it with a bit more flour.

Step 4 – Transfer to Pizza Peel or Baking Sheet: If using a pizza stone, sprinkle some cornmeal on a pizza peel to prevent sticking. If you’re using a baking sheet, you can place the rolled-out dough directly on it.

Step 5 – Add Sauce and Cheese: Spread a thin layer of the prepared pizza sauce over the dough, leaving a border around the edges. Place the sliced mozzarella evenly over the sauce.


Step 6 – Bake the Pizza: If using a pizza stone, carefully slide the pizza onto the preheated stone in the oven. If using a baking sheet, simply place the baking sheet in the oven. Bake the pizza for about 10-12 minutes, or until the crust is golden and the cheese is melted and bubbly.

Step 7 – Garnish and Finish: Once the pizza is out of the oven, immediately scatter fresh basil leaves over the hot cheese. Drizzle a bit of extra-virgin olive oil over the pizza and season with a sprinkle of salt and pepper.

Step 8 – Slice and Serve: Allow the pizza to cool for a minute or two before slicing it into wedges. Serve the Margherita Pizza while it’s still hot and enjoy the wonderful flavours of the classic combination.